In the rapidly evolving age of AI, large language models (LLMs) have emerged as transformative technologies, capable of understanding and generating human-like text with unprecedented sophistication. This blog aims to demystify the process of building a production-ready LLM-based API using LangChain, OpenAI and Python FastAPI as the server fframework, revealing how developers can harness the power of AI to create intelligent, responsive applications.
We’ll be using FastAPI because it offers several key advantages over its counterparts. Its asynchronous capabilities enable exceptional performance and scalability, handling concurrent requests efficiently. It also comes with built-in type checking and validation via Pydantic, reducing runtime errors and improving code reliability. The framework’s automatic API documentation generation saves development time and enhances API usability. it’s intuitive design and modern python features like type hints makes it developer-friendly and future-proof. Additionally, it’s strong security features and flexibility in integrating with various databases and libraries make it suitable for a wide range of web development tasks and now lets dive into the project.
We’ll be using langchain because it’s an ideal choice for LLM based projects and it provides a modular architecture for integrating with vaious language models and data sources. LangChain’s memory management capabilities are particularly valuable for maintaining context in conversational AI systems. Additionally, its Python-based implementation ensures ease of use and flexibility, making it accessible for developers of all skill levels
Setting Up
Lets clone this repo to get started, this approach ensures we have all the necessary files and the correct project structure from the onset. Follow these steps to set up your development environment.
- Create a virtual environment
python3 -m venv .venv
2. Activate the virtual environment
source .venv/bin/activate  # On macOS/Linux
.venv\Scripts\activate     # On Windows
3. Install the required packages
pip install -r requirements.txt
This will install all necessary dependencies, including FastAPI, Unicorn, LangChain and other required libraries.
5. Project Structure:
After cloning, your project structure should look like this:
demo-llm-project/
├── app/
│   ├── main.py
│   ├── api/
│   │   └── routes/
│   │       └── llm_routes.py
│   ├── core/
│   │   └── llm/
│   │       └── llm_handler.py
│   └── schemas/
│       └── llm_schemas.py
├── terraform/
│   ├── main.tf
│   ├── variables.tf
│   ├── outputs.tf
│   ├── ecs.tf
│   ├── ecr.tf
│   ├── vpc.tf
│   ├── containerDefinitions.json
│   ├── monitoring.tf
│   ├── security_groups.tf
│   ├── load_balancing.tf
|   ├── user_data.sh
│   └── iam.tf
├── .env
├── .gitignore
├── README.md
├── requirements.txt
└── Makefile
Our application code resides in the app folder and our infrastructure code would reside in the terraform folder (we’ll discuss this later in this post)
With these steps completed, you’ll have a fully set up development environment ready for building your LLM-based API using Python, FastAPI, and LangChain. The project structure provides a clean separation of concerns, making it easy to navigate and extend the application as needed.
Our .env. should look like this:
export OPENAI_API_KEY={OPENAI_API_KEY}
export AWS_ACCOUNT_NUMBER={AWS_ACCOUNT_NUMBER}
export AWS_ACCESS_KEY_ID={AWS_ACCESS_KEY_ID}
export AWS_SECRET_ACCESS_KEY={AWS_SECRET_KEY}
export AWS_DEFAULT_REGION={AWS_DEFAULT_REGION}
We should populate these variables with the appropriate key, here’s a guide on getting your openai api key. We can get the remaining values from our aws account that we would be using to eventually deploy our application. After getting all our env variables we can run the following command to make sure that they’re present in our shell window
source .env.
Create LLM Application
Now that we have our project set up, let’s dive into creating the core functionality of our LLM-based API. We’ll start by implementing the LLM functionality using LangChain, which simplifies the process of working with large language models. Then, we’ll create FastAPI routes to expose our LLM capabilities as API endpoints, and finally, we’ll handle user input and generate responses.
First, let’s implement the core LLM functionality in our llm_handler.py file:
from langchain.llms import OpenAI
from fastapi import HTTPException

async def generate_text(prompt: str, max_tokens: int = 50):
    try:
        llm = OpenAI(api_key="your_openai_api_key")
        response = await llm.agenerate([prompt], max_tokens=max_tokens)
        return response.generations[0][0].text
    except Exception as e:
        raise HTTPException(status_code=500, detail=str(e))
This function uses LangChain’s OpenAI wrapper to interact with the language model asynchronously. It takes a prompt and an optional max_tokens parameter, generates a response, and handles potential errors.
In our LLM-based API, we use Pydantic to define robust request and response models. The InputData and OutputData classes inherit from BaseModel, providing automatic data validation and serialization. By using Pydantic’s Field with examples, we enhance API documentation and testing capabilities. This approach ensures type safety, data integrity, and improves the developer experience by offering clear input and output format expectations. Pydantic’s seamless integration with FastAPI enables automatic request validation and response serialization, reducing boilerplate code for data handling.
from pydantic import BaseModel, Field

class InputData(BaseModel):
    prompt: str = Field(examples=["Tell me a joke about programming"])

class OutputData(BaseModel):
    prompt: str = Field(examples=["Why do programmers prefer dark mode? Because light attracts bugs!"])
Now that we’ve implemented the core LLM functionality, let’s create the FastAPI routes to expose our LLM capabilities as API endpoints. In your llm_routes.py file, add the following code:
from fastapi import APIRouter, HTTPException
from app.core.llm.llm_handler import generate_text
from app.schemas.llm_schemas import InputData, OutputData

router = APIRouter()

@router.post("/generate", response_model=OutputData)
async def generate(input_data: InputData):
    try:
        response = await generate_text(input_data.prompt)
        return OutputData(response=response)
    except Exception as e:
        raise HTTPException(status_code=500, detail=str(e))

@router.get("/health")
async def health_check():
    return {"status": "healthy"}
This code creates two routes:
- A POST route
/generatethat accepts input data and returns generated text. - A GET route
/healthfor simple API health checks.
The /generate route uses our generate_text function from the LLM handler and wraps it in a try-except block for error handling. The InputData and OutputDatamodels ensure proper request validation and response serialization.
To wrap these routes into our main FastAPI application, let’s make sure our main.py looks like this:
from fastapi import FastAPI
from app.api.routes import llm_routes
import uvicorn

app = FastAPI()

app.include_router(llm_routes.router, prefix="/api/v1")

if __name__ == "__main__":
    uvicorn.run(app, host="0.0.0.0", port=8000)
This setup organizes your API under the /api/v1 prefix, allowing for future versioning and expansion of your API
Security
Data validation to prevent potential SQL injection attacks and cross-site scripting (XSS) attacks. We can do this by leveraging Pydantics built in validation capabiliteis and add custom validators.
from pydantic import BaseModel, Field, validator
import re

class InputData(BaseModel):
    prompt: str = Field(..., min_length=1, max_length=1000, examples=["Tell me a joke about programming"])

    @validator('prompt')
    def sanitize_prompt(cls, v):
        # Remove any HTML tags
        v = re.sub('<[^<]+?>', '', v)
        # Escape special characters
        v = v.replace("'", "''").replace('"', '""')
        return v
Securing our application is crucual to protect agaisnt potential vulnerablilities and ensure the integrity of our service. We’ll consider the following steps to secure.
Configuring proper cross-origin resource sharing (CORS) settings is crucial for controlling access to different domains and enhancing the security of web applications. Here’s how we can implement it in our application:
ALLOWED_ORIGINS = ["https://yourdomain.com"]

app.add_middleware(
    CORSMiddleware,
    allow_origins=ALLOWED_ORIGINS,
    allow_credentials=True,
    allow_methods=["*"],
    allow_headers=["*"],
)
There’s many more ways we can secure our application as how secure your application depends on how much time you spend on security.
Deploy and Serve
All the code needed to run this application on the cloud would be present in the /terraform folder found in the root directory but we’ll be talking about the important pieces in this section, all pieces are important ECR, EC2, ECS, VPC Before we start let’s make sure we have an AWS account and have our AWS_REGION, AWS_ACCESS_KEY_ID and AWS_SECRET_ACCESS_KEY exported to our terminal
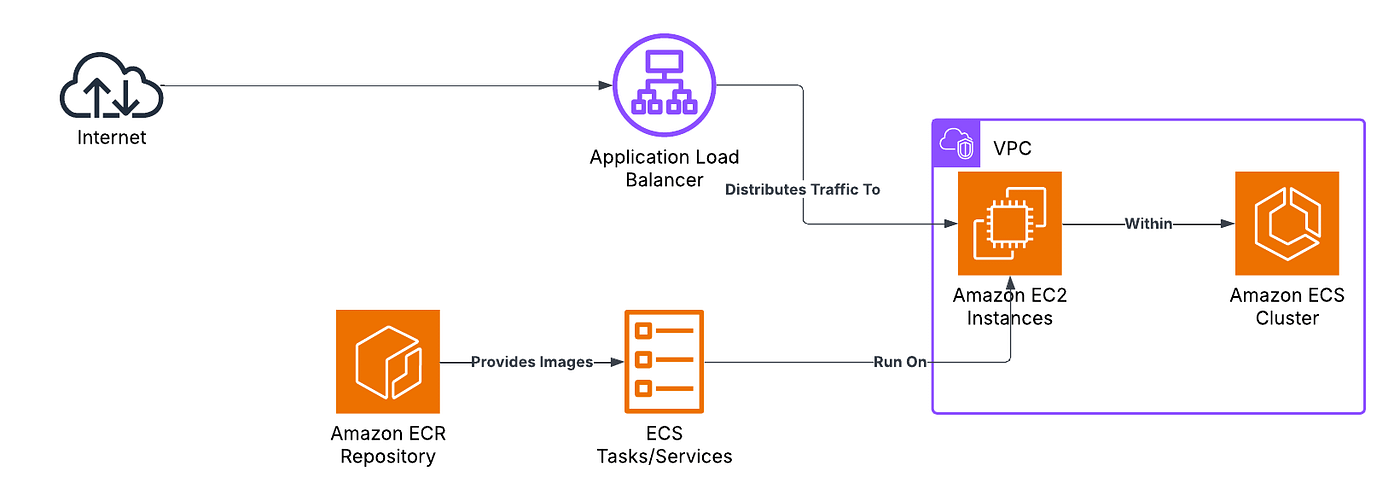
We’ll be deploying our application on AWS with a simple ECR, ECS and EC2 integration with the diagram below explaining painting a better picture:
Our main.tf file will represent the entrypoint to our terraform cloud infra. Most of the code below is self explanatory but the ‘data’ block below retreives information about availability zones in the specified region. This data can be used later in the configuration to distribute resources across multiple AZs for high availability.
terraform {
  required_providers {
    aws = {
      source  = "hashicorp/aws"
      version = "~> 4.0"
    }
  }
}

provider "aws" {
  region = var.region
}

data "aws_availability_zones" "available_zones" {
  state = "available"
}
We’ll be using and reusing the following variables across our cloud infra:
variable "namespace" {
  default     = "demo-llm"
  type        = string
  description = "the namespace of the ECS cluster"
}

variable "region" {
  default     = "us-west-2"
  type        = string
  description = "value of the region"
}
Now let’s create a ecr.tf file that will represent our ecr docker image.
resource "aws_ecr_repository" "demo_project" {
  name         = "demo-llm-project"
  force_delete = true
}
We’ll start off by creating a Dockerfile that we will use to build our docker image that ECR will provide to ECS to run our service.
FROM python:3.11-slim
WORKDIR /app

COPY . /app/
RUN pip install --no-cache-dir -r requirements.txt
EXPOSE 80
CMD ["uvicorn", "main:app", "--host", "0.0.0.0", "--port", "80"]
In our cloned repo we can see a makefile in the root directory that has a ecr-push command that logs into ecr, builds the docker image, tags it and pushes it to ECR. Now let’s run the following command to make it all happen.
make ecr-push
We’ll be using the following code to setup our ecs task definition. This serves as the blueprint of our application. It defines how one or more containers should run within the ECS environment, specifying important parameters such as the Docker image to use, CPU and memory requirements, networking mode, and environment variables.
resource "aws_ecs_cluster" "ecs_cluster" {
  name = "${var.namespace}-cluster"
}

resource "aws_ecs_task_definition" "demo-llm" {
  family                   = "${var.namespace}-task"
  network_mode             = "host"
  requires_compatibilities = ["EC2"]
  memory                   = 1026
  cpu                      = 1026
  execution_role_arn       = aws_iam_role.ecs_agent.arn
  task_role_arn            = aws_iam_role.ecs_agent.arn

  runtime_platform {
    operating_system_family = "LINUX"
    cpu_architecture        = "ARM64"
  }
  container_definitions = file("containerDefinition.json")
}

resource "aws_ecs_service" "demo-llm" {
  name            = "${var.namespace}-service"
  cluster         = aws_ecs_cluster.ecs_cluster.id
  task_definition = aws_ecs_task_definition.demo-llm.arn
  desired_count   = 1
  launch_type     = "EC2"

  load_balancer {
    target_group_arn = aws_lb_target_group.demo_llm.arn
    container_name   = "${var.namespace}-worker"
    container_port   = 8000
  }
}
Traffic to our application would be coming from the load balancer and they play a crucial role in distributing incoming traffic across multiple servers or resources, ensuring efficient utilization and improved performance of web applications. By integrating a load balancer with your ECS service, you create a highly available, scalable, and reliable web application that can efficiently handle varying levels of traffic. The following code shows how to set it up:
resource "aws_lb" "demo_llm_lb" {
  name               = "${var.namespace}-lb"
  load_balancer_type = "application"
  security_groups    = [aws_security_group.lb_sg.id]
  subnets            = aws_subnet.pub_subnet[*].id

  tags = {
    Name = "demo-llm-lb"
  }
}

resource "aws_lb_target_group" "demo_llm" {
  name     = "${var.namespace}-tg"
  port     = 8000
  protocol = "HTTP"
  vpc_id   = aws_vpc.vpc.id

  health_check {
    path                = "/api/v1/health"
    enabled             = true
    matcher             = "200-499"
    healthy_threshold   = 2
    unhealthy_threshold = 2
    timeout             = 5
    interval            = 300
  }
}
We’ll be using the following code to setup our EC2 instance:
resource "aws_instance" "ec2_instance" {
  associate_public_ip_address = true
  ami                         = "ami-0ce02c6a717420418"
  subnet_id                   = aws_subnet.pub_subnet.*.id[0]
  instance_type               = "t4g.small"
  iam_instance_profile        = aws_iam_instance_profile.ecs_agent.name
  vpc_security_group_ids      = [aws_security_group.ecs_sg.id, aws_security_group.bastion_sg.id]
  key_name                    = "${var.namespace}-keypair"
  ebs_optimized               = "false"
  source_dest_check           = "true"
  user_data                   = file("${path.module}/user_data.sh")

  root_block_device {
    volume_size           = 30
    volume_type           = "standard"
    delete_on_termination = true
  }
  metadata_options {
    http_tokens = "required"
  }

  tags = {
    Name = "${var.namespace}-ec2-instance"
  }

  lifecycle {
    ignore_changes = [ami, user_data, subnet_id, key_name, ebs_optimized, instance_type]
  }

}
Important things to note here are:
- AMI (Amazon Machine Image): This is required to launch an instance. It comes pre-configured with an operating system, application server, and applications necessary to run our code. The AMI serves as a template for the instance’s root volume.
- user_data.sh: This is a shell script that runs when the instance launches. It installs essential applications for us and configures the ECS environment. Specifically, it adds our ECS_CLUSTER name to the ECS configuration file at /etc/ecs/ecs.config. This step is crucial for integrating the EC2 instance with our ECS cluster.
These components work together to ensure our EC2 instance is properly set up and ready to join our ECS cluster upon launch.
In this post, we’ve covered the essential components for building an application server using FastAPI to interface with the OpenAI API — essentially creating a GPT wrapper. We’ve highlighted how FastAPI simplifies API development with features like automatic interactive documentation using Swagger UI, data validation with Pydantic, and asynchronous support for high performance. While we didn’t delve into every detail, such as custom modules for environment variables, authentication, and more advanced error handling, I encourage you to explore the GitHub repository for a comprehensive understanding.